SPDX-License-Identifier: Apache-2.0
Copyright (c) 2020 Intel Corporation
User Plane Function (UPF)
Introduction
The User Plane Function (UPF) is the evolution of the Control and User Plane Separation (CUPS), which is part of the 3GPP Release 14 in Evolved Packet Core (EPC). CUPS allows the Packet data network Gateway (PGW) to be split into PGW - Control Plane Function (PGW-C) and PGW - User Plane Function (PGW-U). By doing this, PGW-U can be distributed and used for Edge Cloud deployment.
Defined in 3GPP technical specification 23.501, the UPF provides:
- Anchor point for Intra/Inter Radio Access Technology(RAT) mobility (when applicable).
- External Packet Data Unit(PDU) Session point of interconnect to Data Network.
- Packet routing and forwarding (e.g., support of Uplink classifier to route traffic flows to an instance of a data network and support of Branching point to support multi-homed PDU Session).
- Packet inspection (e.g., Application detection based on service data flow template and the optional Packet Flow Descriptions(PFDs) received from the Session Management Function(SMF) also).
- User Plane part of policy rule enforcement (e.g., Gating, Redirection, Traffic steering).
- Lawful intercept (UP collection).
- Traffic usage reporting.
- Qualiy of Service(QoS) handling for user plane (e.g., UL/DL rate enforcement and Reflective QoS marking in DL).
- Uplink Traffic verification (Service Description Flow(SDF) to QoS Flow mapping).
- Transport level packet marking in the uplink and downlink.
- Downlink packet buffering and downlink data notification triggering.
- Sending and forwarding of one or more “end marker(s)” to the source Next Generation-Radio Access Network(NG-RAN) node.
- Functionality to respond to Address Resolution Protocol (ARP) requests and / or IPv6 Neighbor Solicitation requests based on local cache information for the Ethernet* PDUs. The UPF responds to the ARP and / or the IPv6 Neighbor Solicitation Request by providing the Media Access Control(MAC) address corresponding to the IP address sent in the request.
As part of the end-to-end integration of the Edge cloud deployment using Smart Edge Open, a reference 5G Core network is used along with reference RAN (FlexRAN). The diagram below shows the UPF and Next Generation Core(NGC) Control plane deployed on the Smart Edge Open platform along with the necessary microservice and Kubernetes* (K8s) enhancements required for high throughput user plane workload deployment.
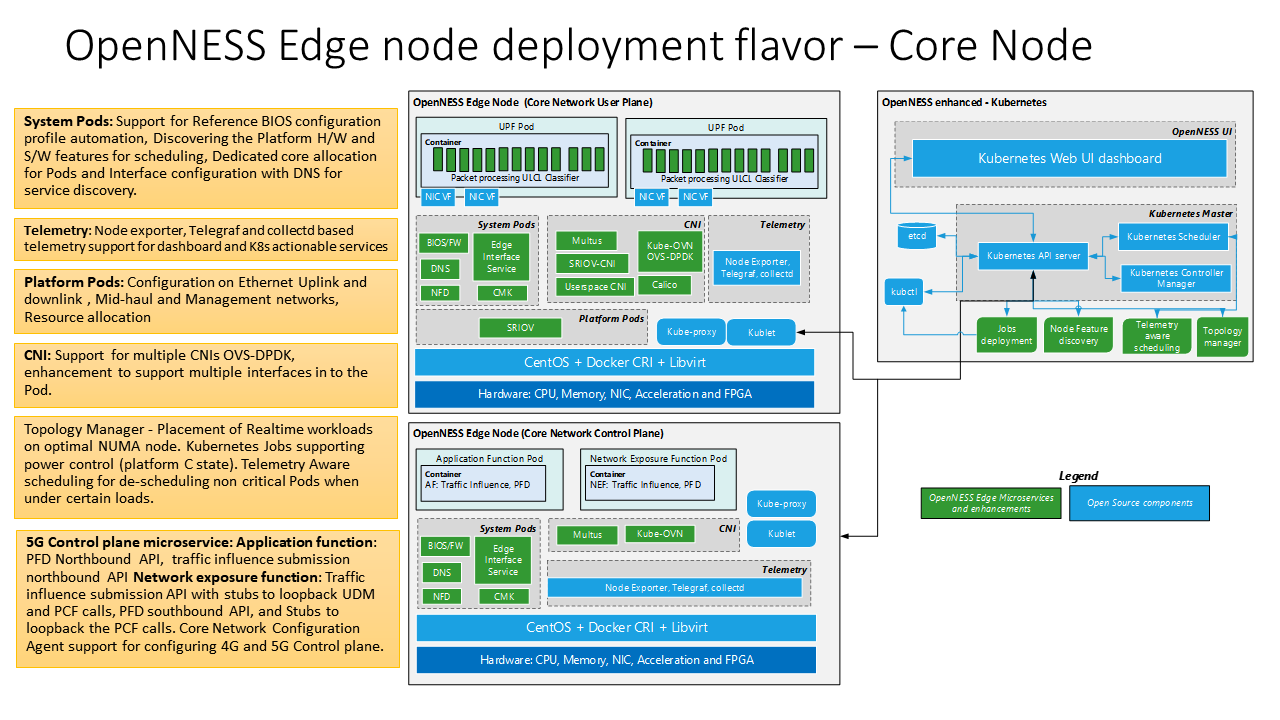
NOTE: The UPF source or binary is not released as part of Smart Edge Open.
Purpose
This document provides the required steps to deploy UPF on the Smart Edge Open platform. 4G/(Long Term Evolution network)LTE or 5G UPF can run as network functions on the Edge node in a virtualized environment. The reference Dockerfile and 5g-upf.yaml provide details on how to deploy UPF as a Cloud-native Network Function (CNF) in a K8s pod on Smart Edge Open edge node using Smart Edge Open Enhanced Platform Awareness (EPA) features.
These scripts are validated through a reference UPF solution (implementation is based on Vector Packet Processing (VPP)) that is not part of the Smart Edge Open release.
NOTE: The AF and NEF Dockerfile and pod specification can be found here:
- AF - dockerfile. Pod Specification
- NEF - dockerfile. Pod Specification
- OAM - dockerfile. Pod Specification
How to build
-
To keep the build and deploy process straightforward, the Docker* build and image are stored on the Edge node.
-
Copy the upf binary package to the Docker build folder. Reference Docker files and the Helm chart for deploying the UPF is available at edgeapps_upf_docker and edgeapps_upf_helmchart respectively
ne-node# cp -rf <5g-upf-binary-package> edgeapps/network-functions/core-network/5G/UPF/upf -
Build the Docker image.
 ne-node# cd edgeapps/network-functions/core-network/5G/UPF
 ne-node# ./build_image.sh -b ./upf/ -i upf-cnf

 ne-node# docker image ls | grep upf
 upf-cnf     1.0                 e0ce467c13d0        15 hours ago        490MB
UPF configuration
To keep the bring up setup simple, the UPF configuration can be provided through the Helm charts. A reference Helm chart is available at edgeapps_upf_helmchart
Below is a list of minimal configuration parameters for VPP-based applications such as UPF.
Platform-specific information
- SR-IOV PCIe interface(s) bus address
- CPU core dedicated for UPF workloads
- Amount of hugepages
UPF application-specific information
- N3, N4, N6, and N9 Interface IP addresses
How to start
-
Ensure that all EPA microservices and Enhancements (part of Smart Edge Open playbook) are deployed
kubectl get po --all-namespaces. Also, ensure thatmultus,sriov-cni, andsriov-device-pluginpods are alive on the controller and node. Theinterface servicepod should also be alive on the node.ne-controller# kubectl get po --all-namespaces NAMESPACE NAME READY STATUS RESTARTS AGE kube-ovn kube-ovn-cni-8x5hc 1/1 Running 17 7d19h kube-ovn kube-ovn-cni-p6v6s 1/1 Running 1 7d19h kube-ovn kube-ovn-controller-578786b499-28lvh 1/1 Running 1 7d19h kube-ovn kube-ovn-controller-578786b499-d8d2t 1/1 Running 3 5d19h kube-ovn ovn-central-5f456db89f-l2gps 1/1 Running 0 7d19h kube-ovn ovs-ovn-56c4c 1/1 Running 17 7d19h kube-ovn ovs-ovn-fm279 1/1 Running 5 7d19h kube-system coredns-6955765f44-2lqm7 1/1 Running 0 7d19h kube-system coredns-6955765f44-bpk8q 1/1 Running 0 7d19h kube-system etcd-silpixa00394960 1/1 Running 0 7d19h kube-system kube-apiserver-silpixa00394960 1/1 Running 0 7d19h kube-system kube-controller-manager-silpixa00394960 1/1 Running 0 7d19h kube-system kube-multus-ds-amd64-bpq6s 1/1 Running 17 7d18h kube-system kube-multus-ds-amd64-jf8ft 1/1 Running 0 7d19h kube-system kube-proxy-2rh9c 1/1 Running 0 7d19h kube-system kube-proxy-7jvqg 1/1 Running 17 7d19h kube-system kube-scheduler-silpixa00394960 1/1 Running 0 7d19h kube-system kube-sriov-cni-ds-amd64-crn2h 1/1 Running 17 7d19h kube-system kube-sriov-cni-ds-amd64-j4jnt 1/1 Running 0 7d19h kube-system kube-sriov-device-plugin-amd64-vtghv 1/1 Running 0 7d19h kube-system kube-sriov-device-plugin-amd64-w4px7 1/1 Running 0 4d21h openness eaa-78b89b4757-7phb8 1/1 Running 3 5d19h openness edgedns-mdvds 1/1 Running 16 7d18h openness interfaceservice-tkn6s 1/1 Running 16 7d18h openness nfd-master-82dhc 1/1 Running 0 7d19h openness nfd-worker-h4jlt 1/1 Running 37 7d19h openness syslog-master-894hs 1/1 Running 0 7d19h openness syslog-ng-n7zfm 1/1 Running 16 7d19h -
Make sure that the Virutal Function(VF) interfaces to the mentioned interface on node host is created. You should see a new interface type, “Ethernet Virtual Function“. In the below example, for the configuration where 2 VFs have been requested for 1 Physical Functional(PF) interface, the output shows that for PF “af:00.0” the corresponding two VF’s are “af:0a.0” and “af:0a.1”.
ne-node# lspci | grep Eth af:00.0 Ethernet controller: Intel Corporation Ethernet Controller X710 for 10GbE SFP+ (rev 02) af:00.1 Ethernet controller: Intel Corporation Ethernet Controller X710 for 10GbE SFP+ (rev 02) af:0a.0 Ethernet controller: Intel Corporation Ethernet Virtual Function 700 Series (rev 02) af:0a.1 Ethernet controller: Intel Corporation Ethernet Virtual Function 700 Series (rev 02) -
Enable the vfio-pci/igb-uio driver on the node. The below example shows the enabling of the
igb_uiodriver:ne-node# /opt/openness/dpdk-19.11.1/usertools/dpdk-devbind.py -b igb_uio 0000:af:0a.0 ne-node# /opt/openness/dpdk-19.11.1/usertools/dpdk-devbind.py --status Network devices using DPDK-compatible driver ============================================ 0000:af:0a.0 'Ethernet Virtual Function 700 Series 154c' drv=igb_uio unused=i40evf,vfio-pci Network devices using kernel driver =================================== 0000:af:00.0 'Ethernet Controller X710 for 10GbE SFP+ 1572' if=enp175s0f0 drv=i40e unused=igb_uio,vfio-pci 0000:af:0a.1 'Ethernet Virtual Function 700 Series 154c' if=enp175s10f1 drv=i40evf unused=igb_uio,vfio-pci -
Check that ConfigMaps has the resource name as
intel_sriov_dpdkalong with the devices and drivers. In the example below, the devices154cand the driverigb_uioare part of ConfigMaps. If the device and driver are not present in the ConfigMap, they need to be added.ne-controller# kubectl get configmaps -n kube-system | grep sriov sriov-release-sriovdp-config 1 55m ne-controller# kubectl describe configmap sriov-release-sriovdp-config -n kube-system Name: sriov-release-sriovdp-config Namespace: kube-system Labels: <none> Annotations: <none> Data ==== config.json: ---- { "resourceList": [{ "resourceName": "intel_sriov_netdevice", "selectors": { "vendors": ["8086"], "devices": ["154c", "10ed"], "drivers": ["iavf", "i40evf", "ixgbevf"] } }, { "resourceName": "intel_sriov_dpdk", "selectors": { "vendors": ["8086"], "devices": ["154c", "10ed"], "drivers": ["igb_uio"] } } ] } Events: <none> -
Check and change the network attachment from
sriov_netdevicetosriov_dpdk:ne-controller# kubectl get network-attachment-definitions NAME AGE sriov-openness 59m ne-controller# kubectl describe network-attachment-definitions sriov-openness Name: sriov-openness Namespace: default Labels: <none> Annotations: k8s.v1.cni.cncf.io/resourceName: intel.com/intel_sriov_netdevice API Version: k8s.cni.cncf.io/v1 Kind: NetworkAttachmentDefinition Metadata: Creation Timestamp: 2020-06-10T02:45:03Z Generation: 1 Resource Version: 2182 Self Link: /apis/k8s.cni.cncf.io/v1/namespaces/default/network-attachment-definitions/sriov-openness UID: 6c019ef1-b8d3-43ea-b5f9-3355a6198e53 Spec: Config: { "type": "sriov", "cniVersion": "0.3.1", "name": "sriov-openness-network", "ipam": { "type": "host-local", "subnet": "192.168.2.0/24", "routes": [{ "dst": "0.0.0.0/0" }], "gateway": "192.168.2.1" } } Events: <none> ne-controller# kubectl get node ne-node -o json | jq '.status.allocatable' | grep sriov "intel.com/intel_sriov_netdevice": "2", ne-controller# kubectl delete network-attachment-definitions sriov-openness ne-controller# cat <<EOF | kubectl create -f - apiVersion: "k8s.cni.cncf.io/v1" kind: NetworkAttachmentDefinition metadata: name: sriov-openness annotations: k8s.v1.cni.cncf.io/resourceName: intel.com/intel_sriov_dpdk spec: config: '{ "type": "sriov", "cniVersion": "0.3.1", "name": "sriov-openness-network", "ipam": { "type": "host-local", "subnet": "192.168.2.0/24", "routes": [{ "dst": "0.0.0.0/0" }], "gateway": "192.168.2.1" } }' EOF ne-controller# kubectl describe network-attachment-definitions sriov-openness Name: sriov-openness Namespace: default Labels: <none> Annotations: k8s.v1.cni.cncf.io/resourceName: intel.com/intel_sriov_dpdk API Version: k8s.cni.cncf.io/v1 Kind: NetworkAttachmentDefinition Metadata: Creation Timestamp: 2020-06-10T03:52:58Z Generation: 1 Resource Version: 21790 Self Link: /apis/k8s.cni.cncf.io/v1/namespaces/default/network-attachment-definitions/sriov-openness UID: 959c3630-74c5-45b0-ab39-cd8dd7c87c5f Spec: Config: { "type": "sriov", "cniVersion": "0.3.1", "name": "sriov-openness-network", "ipam": { "type": "host-local", "subnet": "192.168.2.0/24", "routes": [{ "dst": "0.0.0.0/0" }], "gateway": "192.168.2.1" } } Events: <none> -
Restart the pod
sriov-device-pluginfor modifications in ConfigMap and network attachments to take effect. Delete the existing device-plugin pod of ne-node and it will restart automatically in about 20 seconds:ne-controller# kubectl delete pod -n kube-system <sriov-release-kube-sriov-device-plugin-xxx> -
Check for the network attachment, you should see
intel_sriov_dpdkwith 1 allocated VF.ne-controller# kubectl get node ne-node -o json | jq '.status.allocatable' | grep sriov "intel.com/intel_sriov_dpdk": "1", "intel.com/intel_sriov_netdevice": "1",
Deploy UPF pod from Smart Edge Open controller
In this reference validation, UPF will be deployed using Helm charts. The reference Helm chart for UPF is available at edgeapps_upf_helmchart
helm install <pod-name> <path to the upf helm chart> <list of configuration values>
Here is an example:
ne-controller# helm install upf-cnf ./upf/ --set image.repository=upf-cnf --set node.name=ne-node --set node.path=/home/nruser --set upf.vf_if_name=VirtualFunctionEthernetaf/a/0 --set upf.pci_bus_addr=0000:af:0a.1 --set upf.uio_driver=igb_uio --set upf.huge_memory=6G --set upf.main_core=2 --set upf.worker_cores="3\,4" --set upf.pfcp_thread.cores=5 --set upf.pfcp_thread.count=2 --set upf.n3_addr=192.179.120.180/24 --set upf.n4_addr=192.179.120.180 --set upf.n6_addr=192.179.120.180/24 --set upf.n6_gw_addr=192.168.1.180 --set hugePageSize=hugepages-1Gi --set hugePageAmount=4Gi
The following table describes the helm parameters using the above example.
| Parameter | Description |
|---|---|
| image.repository=upf-cnf | Image repository to upf-cnf, i.e., local image on the node |
| node.name=ne-node | Node on which the UPF is to be deployed |
| node.path=/home/nruser | Location on the node where the UPF binary is available |
| upf.vf_if_name=VirtualFunctionEthernetaf/a/0 | VF interface name |
| hugePageSize=hugepages-1Gi | Hugepage size |
| hugePageAmount=4Gi | Amount of hugepages to be reserved for the pod |
| upf.pci_bus_addr=0000:af:0a.1 | Full format of the PCI bus addr of the VF interface the UPF needs to be attached |
| upf.uio_driver=igb_uio | UIO driver used vfio-pci or igb_uio |
| upf.main_core=2 | Main core |
| upf.worker_cores=”3\,4” | Worker cores |
| upf.pfcp_thread.cores=5 | Core for the pfcp thread |
| upf.pfcp_thread.count=2 | Number of pfcp threads |
| upf.n3_addr=192.179.120.180/24 | The N3 I/f ip address along with subnet info |
| upf.n4_addr=192.179.120.180 | The N4 I/f ip address along with subnet info |
| upf.n6_addr=192.168.1.180/24 | The N6 I/f ip address along with subnet info |
| upf.n6_gw_addr=192.168.1.180 | The N6 gateway IP address |
To start UPF
In this reference validation, the UPF application will be started manually after the UPF pod is deployed.
-
Verify that the UPF pod is up and running
kubectl get po:ne-controller# kubectl get po NAME READY STATUS RESTARTS AGE upf-cnf 1/1 Running 0 6d19h -
Exec into the UPF pod and start the UPF:
 ne-controller# kubectl exec -it upf-cnf -- /bin/bash
 upf-cnf# sudo -E ./run_upf.sh
Uninstall UPF pod from Smart Edge Open controller
In this reference validation, UPF can be deleted/uninstalled using the UPF Helm chart.
-
Get the Helm chart release name for the UPF:
ne-controller# helm list | grep upf upf-cnf default 1 2020-06-16 12:37:53.40562176 +0530 IST deployed upf-0.1.0 0.1.0 -
Uninstall the
upf-cnfHelm chart:ne-controller# helm uninstall upf-cnf release "upf-cnf" uninstalled -
The list of pods should not show the UPF pod now.
 ne-controller# kubectl get po | grep upf
 No resources found in default namespace.
List of abbreviations
- UPF - User Plane Function
- CUPS - Control and User Plane Separation
- EPC - Evolved Packet Core
- PGW - PDN Gateway
- RAT - Radio Access Technology
- PDU - Packet Data Unit
- MAC - Media Access Control
- QoS - Qualtion of Service
- SDF - Service Description Flow
- NG-RAN - Next Generation-Radio Access Network
- NGC - Next Generation Core
- VPP - Vector Packet Processing
- VP - Virutal Function interface
- PF - Physical functional interface