SPDX-License-Identifier: Apache-2.0
Copyright (c) 2020 Intel Corporation
Smart Edge Open Radio Access Network (Intel® Smart Edge Open Access Edge Experience Kit)
- Introduction
- Building the FlexRAN image
- FlexRAN hardware platform configuration
- Deploying the Access Edge Experience Kit for FlexRAN
- Deploying and Running the FlexRAN pod
- Setting up 1588 - PTP based Time synchronization
- BIOS configuration
- CPU frequency configuration
- References
Introduction
Radio Access Network (RAN) is the edge of wireless network. 4G and 5G base stations form the key network function for the edge deployment. In Smart Edge Open, FlexRAN is used as a reference for 4G and 5G base stations as well as 4G and 5G end-to-end testing.
FlexRAN offers high-density baseband pooling that could run on a distributed Telco* cloud to provide a smart indoor coverage solution and next-generation fronthaul architecture. This 4G and 5G platform provides the open platform ‘smarts’ for both connectivity and new applications at the edge of the network, along with the developer tools to create these new services. FlexRAN running on the Telco Cloud provides low latency compute, storage, and network offload from the edge. Thus, saving network bandwidth.
FlexRAN 5GNR Reference PHY is a baseband PHY Reference Design for a 4G and 5G base station, using Intel® Xeon® processor family with Intel® architecture. This 5GNR Reference PHY consists of a library of c-callable functions that are validated on several technologies from Intel (Intel® microarchitecture code name Broadwell, Intel® microarchitectures code name Skylake, Cascade Lake, and Intel® microarchitecture Ice Lake) and demonstrates the capabilities of the software running different 5GNR L1 features. The functionality of these library functions is defined by the relevant sections in [3GPP TS 38.211, 212, 213, 214, and 215]. Performance of the Intel 5GNR Reference PHY meets the requirements defined by the base station conformance tests in [3GPP TS 38.141]. This library of functions will be used by Intel partners and end customers as a foundation for their product development. Reference PHY is integrated with third-party L2 and L3 to complete the base station pipeline.
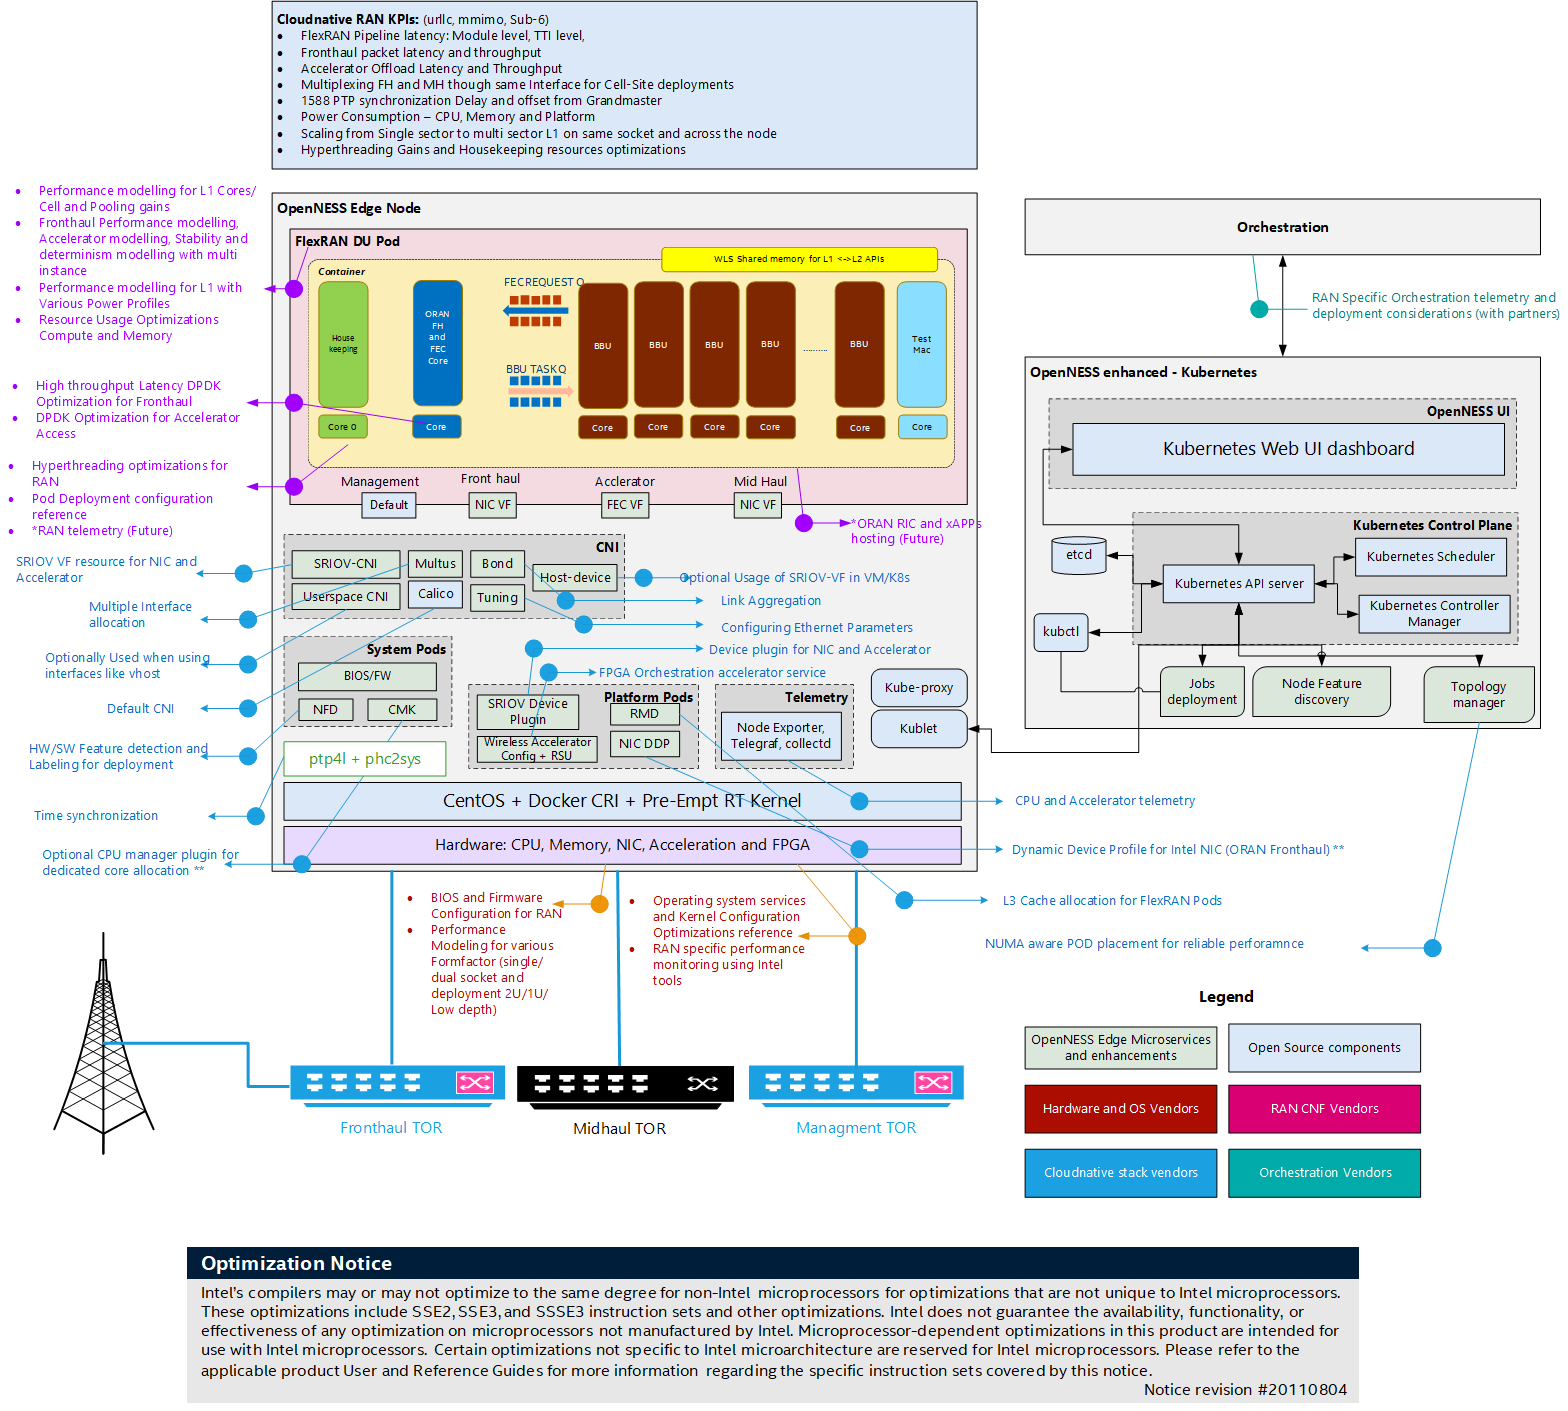
The diagram below shows FlexRAN DU (Real-time L1 and L2) deployed on the Smart Edge Open platform with the necessary microservices and Kubernetes* enhancements required for real-time workload deployment.
This document aims to provide the steps involved in deploying FlexRAN 5G (gNb) on the Smart Edge Open platform.
NOTE: This document covers both FlexRAN 4G and 5G. All the steps mentioned in this document use 5G for reference. Refer to the FlexRAN 4G Reference Solution L1 User Guide #570228 for minor updates needed to build, deploy, and test FlexRAN 4G.
Building the FlexRAN image
This section explains the steps involved in building the FlexRAN image. Only L1 and L2-stub will be part of these steps. Real-time L2 (MAC and RLC) and non-real-time L2 and L3 are out of scope as it is a part of the third-party component.
- Contact your Intel representative to obtain the package
- Untar the FlexRAN package.
-
Set the required environmental variables:
export RTE_SDK=$localPath/dpdk-20.11 export RTE_TARGET=x86_64-native-linuxapp-icc export WIRELESS_SDK_TARGET_ISA=avx512 export RPE_DIR=${flexranPath}/libs/ferrybridge export ROE_DIR=${flexranPath}/libs/roe export XRAN_DIR=${localPath}/flexran_xran export WIRELESS_SDK_TOOLCHAIN=icc export DIR_WIRELESS_SDK_ROOT=${localPath}/wireless_sdk export DIR_WIRELESS_FW=${localPath}/wireless_convergence_l1/framework export DIR_WIRELESS_TEST_4G=${localPath}/flexran_l1_4g_test export DIR_WIRELESS_TEST_5G=${localPath}/flexran_l1_5g_test export SDK_BUILD=build-${WIRELESS_SDK_TARGET_ISA}-icc export DIR_WIRELESS_SDK=${DIR_WIRELESS_SDK_ROOT}/${SDK_BUILD} export FLEXRAN_SDK=${DIR_WIRELESS_SDK}/install export DIR_WIRELESS_TABLE_5G=${flexranPath}/bin/nr5g/gnb/l1/tableNOTE: The environmental variables path must be updated according to your installation and file/directory names.
-
Build L1, WLS interface between L1, L2, and L2-Stub (testmac):
# ./flexran_build.sh -r 5gnr_sub6 -m testmac -m wls -m l1app -b -c -
Once the build has completed, copy the required binary files to the folder where the Docker* image is built. This can be done by using a provided example build-du-dev-image.sh script from Edge Apps Smart Edge Open repository, it will copy the files from the paths provided as environmental variables in previous step. The script will copy the files into the right directory containing the Dockerfile and commence the docker build.
# git clone https://github.com/smart-edge-open/edgeapps.git
# cd edgeapps/network-functions/ran/5G/du-dev
# ./build-du-dev-image.sh
The list of binary files that are used is documented in dockerfile
- ICC, IPP mpi and mkl Runtime
- DPDK build target directory
- FlexRAN test vectors (optional)
- FlexRAN L1 and testmac (L2-stub) binary
- FlexRAN SDK modules
- FlexRAN WLS share library
- FlexRAN CPA libraries
-
The following example reflects the Docker image expected by Helm chart, user needs to adjust the IP address and port of the Harbor registry where Docker image will be pushed:
image: repository: <ip_address>:<port>/intel/flexran5g # Change Me! - please provide IP address and port # of Harbor registry where FlexRAN docker image is uploaded tag: 3.10.0-1160.11.1.rt56 # The tag identifying the FlexRAN docker image, # the kernel version used to build FlexRAN can be used as tag -
Tag the image and push to a local Harbor registry (Harbor registry deployed as part of Converged Edge Experience Kits)
# docker tag flexran5g <harbor_registry_ip_address>:<port>/intel/flexran5g:3.10.0-1160.11.1.rt56

# docker push <harbor_registry_ip_address>:<port>/intel/flexran5g:3.10.0-1160.11.1.rt56
By the end of step 7, the FlexRAN Docker image is created and available in the Harbor registry. This image is copied to the edge node where FlexRAN will be deployed and that is installed with Smart Edge Open Network edge with all the required EPA features including Intel® FPGA Programmable Acceleration Card (Intel® FPGA PAC) N3000. Please refer to the document Using FPGA in Smart Edge Open: Programming, Resource Allocation, and Configuration for details on setting up the Intel® FPGA PAC N3000 with vRAN FPGA image or alternatively to Using the Intel vRAN Dedicated Accelerator ACC100 on Smart Edge Open for details on setting up the Intel vRAN Dedicated Accelerator ACC100 for FEC acceleration.
FlexRAN hardware platform configuration
BIOS
FlexRAN on Intel® microarchitecture code name Skylake, Cascade Lake and Ice Lake, technology from Intel requires a BIOS configuration that disables C-state and enables Config TDP level-2. Refer to the BIOS configuration section in this document.
Setting up CPU Uncore frequency
FlexRAN on Intel® microarchitecture code name Skylake, Cascade Lake and Ice Lake, technology from Intel requires that the CPU frequency and uncore frequency are set up for optimal performance. Refer to the CPU frequency configuration section in this document.
Host kernel command line
usbcore.autosuspend=-1 selinux=0 enforcing=0 nmi_watchdog=0 softlockup_panic=0 audit=0 intel_pstate=disable cgroup_memory=1 cgroup_enable=memory mce=off idle=poll isolcpus=0-23,25-47,49-71,73-95 rcu_nocbs=0-23,25-47,49-71,73-95 kthread_cpus=0,24,48,72 irqaffinity=0,24,48,72 nohz_full=0-23,25-47,49-71,73-95 hugepagesz=1G hugepages=30 default_hugepagesz=1G intel_iommu=on iommu=pt pci=realloc pci=assign-busses rdt=l3cat
NOTE: CPU ID related variables may vary according to CPU SKU
Host kernel version - 3.10.0-1160.11.1.rt56.1145.el7.x86_64
Instructions on how to configure the kernel command line in Smart Edge Open can be found in Smart Edge Open getting started documentation
Deploying the Access Edge Experience Kit for FlexRAN
Information about Access Edge and other Intel® Smart Edge Open Experience Kits can be found in flavours.md documentation. Additionally users are encouraged to familiarize themselves with converged-edge-experience-kits documentation
-
Fulfill the pre-conditions for deploying Smart Edge Open
-
Configure the specification for the Access Edge Experience Kit present under the
flavors/flexrandirectory. The following may need to be adjusted. -
Edit
flavors/flexran/all.ymlas necessary.fpga_sriov_userspace_enablecan be set totrue(default) orfalsedepending on the type of desired accelerator used by FlexRAN for FEC hardware offload. See Intel® FPGA PAC N3000 support in Smart Edge Open.fpga_userspace_vfcan be set toenable: true(default) orenabled: falsedepending on the type of desired accelerator used by FlexRAN for FEC hardware offload. See Intel® vRAN Dedicated Accelerator ACC100 and Intel® FPGA PAC N3000 support in Smart Edge Open.acc100_sriov_userspace_enablecan be set totrueorfalse(default) depending on the type of desired accelerator used by FlexRAN for FEC hardware offload. See Intel® vRAN Dedicated Accelerator ACC100 support in Smart Edge Open.acc100_userspace_vfcan be set toenable: trueorenabled: false(default) depending on the type of desired accelerator used by FlexRAN for FEC hardware offload. See Intel® vRAN Dedicated Accelerator ACC100 and Intel® FPGA PAC N3000 support in Smart Edge Open.ne_opae_fpga_enablecan be set totrue(default) orfalsedepending on the desire to support Intel® FPGA PAC N3000 programming with OPAE within Smart Edge Openreserved_cpusneeds to be set up accordingly to the CPU SKU, number of available CPUs and user’s desire to limit the OS and K8s processes only to non-RT CPUs. It is critical that the CPUs selected forreserved_cpusdo exist on the Edge Node, as forcing K8s processes to a CPU that does not exist will cause a K8s deployment failure. The usual choice (default) of CPUs used for the K8s and OS threads in FlexRAN deployment is a first CPU ID on each NUMA node (ie. on 24 core platform with two NUMA nodesreserved_cpus: "0,24". In case of Hyper-threading enabled CPU, the CPU IDs of both siblings are expected ie.reserved_cpus: "0,24,48,72).e810_driver_enable(default set totrue) provides support for installing recommended version of theiceandiavfkernel drivers for E810 series Intel NICs. This can be disabled if the user does not require this functionality.rmd_operator_enable(default set totrue) provides support for deploying RMD operator enabling configuration od LLC (Last Level Cache) and MBC (Memory Bandwidth Configuration) through RDT.Note: At the time of writing the RMD operator version enabling the 3rd Generation Intel® Xeon® Scalable Processors, code named Ice Lake is not yet available. This may cause a crash of the RMD operator DaemonSet when deployed on Ice Lake.
-
Depending on enabled features provide requested files under correct directories (the directories are to be created by the user).
- When
ne_biosfw_enableis enabled, create aido-converged-edge-experience-kits/ceek/biosfwdirectory and copy the syscfg_package.zip file into it.Note: At the time of writing the version of SYSCFG utility supporting 3rd Generation Intel® Xeon® Scalable Processors platform is not yet generally available.
- When
ne_opae_fpga_enableis enabled, create aido-converged-edge-experience-kits/ceek/opae_fpgadirectory and copy the OPAE_SDK_1.3.7-5_el7.zip file into it. - When
e810_driver_enableis enabled, create aido-converged-edge-experience-kits/ceek/nic_driversdirectory and copy the ice-1.3.2.tar.gz and iavf-4.0.2.tar.gz files into it.
- When
-
Edit the inventory.yml as necessary. For more information see sample deployment definitions. Below is an example to deploy Smart Edge Open on one Edge Controller and one Edge Node, as an
opennessuser.all: vars: cluster_name: flexran_cluster # NOTE: Use `_` instead of spaces. flavor: flexran # NOTE: Flavors can be found in `flavors` directory. single_node_deployment: false # Request single node deployment (true/false). limit: # Limit ansible deployment to certain inventory group or hosts controller_group: hosts: controller: ansible_host: <Edge Controller IP> ansible_user: openness edgenode_group: hosts: node01: ansible_host: <Edge Node IP> ansible_user: openness edgenode_vca_group: hosts: ptp_master: hosts: ptp_slave_group: hosts: -
Run deployment helper script:
# sudo scripts/ansible-precheck.sh -
Deploy Smart Edge Open
# python3 deploy.py
Deploying and Running the FlexRAN pod
-
Deploy the Smart Edge Open cluster with the Access Edge Experience Kit enabled.
-
Confirm that there are no FlexRAN pods and the FPGA configuration pods are not deployed using
kubectl get pods. -
Confirm that all the EPA microservice and enhancements (part of Smart Edge Open playbook) are deployed
kubectl get pods --all-namespaces.NAMESPACE NAME READY STATUS RESTARTS AGE default intel-rmd-operator-78c8d6b47c-h6hrv 1/1 Running 0 2h default rmd-node-agent-silpixa00400827 1/1 Running 0 2h default rmd-silpixa00400827 1/1 Running 0 2h harbor harbor-app-harbor-chartmuseum-74fb748c4d-zg96l 1/1 Running 0 2h harbor harbor-app-harbor-clair-779df4555b-z8nmj 2/2 Running 0 2h harbor harbor-app-harbor-core-69477b9f7c-rkq7m 1/1 Running 0 2h harbor harbor-app-harbor-database-0 1/1 Running 0 2h harbor harbor-app-harbor-jobservice-75bf777dc9-rk2ww 1/1 Running 0 2h harbor harbor-app-harbor-nginx-98b8cc48-5tx4n 1/1 Running 0 2h harbor harbor-app-harbor-notary-server-7dbbfd5775-rx5zc 1/1 Running 0 2h harbor harbor-app-harbor-notary-signer-64f4879947-q6bgh 1/1 Running 0 2h harbor harbor-app-harbor-portal-fd5ff4bc9-bh2wc 1/1 Running 0 2h harbor harbor-app-harbor-redis-0 1/1 Running 0 2h harbor harbor-app-harbor-registry-68cd7c59c7-fhddp 2/2 Running 0 2h harbor harbor-app-harbor-trivy-0 1/1 Running 0 2h kafka cluster-entity-operator-55894648cb-682ln 3/3 Running 0 2h kafka cluster-kafka-0 2/2 Running 0 2h kafka cluster-zookeeper-0 1/1 Running 0 2h kafka strimzi-cluster-operator-68b6d59f74-jj7vf 1/1 Running 0 2h kube-system calico-kube-controllers-646546699f-wl6rn 1/1 Running 0 2h kube-system calico-node-hrtn4 1/1 Running 0 2h kube-system coredns-74ff55c5b-shpw2 1/1 Running 0 2h kube-system coredns-74ff55c5b-w4s7s 1/1 Running 0 2h kube-system descheduler-cronjob-1615305120-xrj48 0/1 Completed 0 2h kube-system etcd-silpixa00400827 1/1 Running 0 2h kube-system kube-apiserver-silpixa00400827 1/1 Running 0 2h kube-system kube-controller-manager-silpixa00400827 1/1 Running 0 2h kube-system kube-multus-ds-amd64-v2dhr 1/1 Running 0 2h kube-system kube-proxy-vg57p 1/1 Running 0 2h kube-system kube-scheduler-silpixa00400827 1/1 Running 0 2h kube-system sriov-release-kube-sriov-cni-ds-amd64-mqfh6 1/1 Running 0 2h kube-system sriov-release-kube-sriov-device-plugin-amd64-cxx6g 1/1 Running 0 2h openness certsigner-6cb79468b5-q2zhr 1/1 Running 0 2h openness eaa-69c7bb7b5d-nqghg 1/1 Running 0 2h openness edgedns-xjwpk 1/1 Running 0 2h openness nfd-release-node-feature-discovery-master-748fff4b6f-89w2j 1/1 Running 0 2h openness nfd-release-node-feature-discovery-worker-5bnvb 1/1 Running 0 2h telemetry collectd-wgcvw 2/2 Running 0 2h telemetry custom-metrics-apiserver-55bdf684ff-tqwwv 1/1 Running 0 2h telemetry grafana-9db5b9cdb-j652q 2/2 Running 0 2h telemetry otel-collector-f9b9d494-h622t 2/2 Running 0 2h telemetry prometheus-node-exporter-jt2cf 1/1 Running 0 2h telemetry prometheus-server-8656f6bf98-r2d9q 3/3 Running 0 2h telemetry telemetry-aware-scheduling-69dbb979f6-n5cz6 2/2 Running 0 2h telemetry telemetry-collector-certs-5glnn 0/1 Completed 0 2h telemetry telemetry-node-certs-vw4fh 1/1 Running 0 2h -
Deploy the Kubernetes job to program the FPGA
-
Deploy the Kubernetes job to configure the BIOS (note: only works on select Intel development platforms)
-
Deploy the Kubernetes job to configure the Intel PAC N3000 FPGA
-
Deploy the FlexRAN Kubernetes pod using a helm chart provided in Edge Apps repository at
edgeapps/network-functions/ran/charts:helm install flexran-pod du-dev -
execinto FlexRAN podkubectl exec -it flexran -- /bin/bash -
Find the PCI Bus function device ID of the FPGA VF assigned to the pod:
printenv | grep FEC -
Edit
phycfg_timer.xmlused for configuration of L1 application with the PCI Bus function device ID from the previous step to offload FEC to this device:<!-- DPDK FEC BBDEV to use [0 - SW, 1 - FPGA, 2 - Both] --> <dpdkBasebandFecMode>1</dpdkBasebandFecMode> <!-- DPDK BBDev name added to the whitelist. The argument format is <[domain:]bus:devid.func> --> <dpdkBasebandDevice>0000:1d:00.1</dpdkBasebandDevice> -
Once in the FlexRAN pod L1 and test-L2 (testmac) can be started.
Setting up 1588 - PTP based Time synchronization
This section provides an overview of setting up PTP-based time synchronization in a cloud-native Kubernetes/docker environment. For FlexRAN specific xRAN fronthaul tests and configurations please refer to the xRAN specific document in the reference section.
NOTE: The PTP-based time synchronization method described here is applicable only for containers. For VMs, methods based on Virtual PTP need to be applied and this is not covered in this document.
Setting up PTP
In the environment that needs to be synchronized, install the linuxptp package, which provides ptp4l and phc2sys applications. The PTP setup needs the primary clock and secondary clock setup. The secondary clock will be synchronized to the primary clock. At first, the primary clock will be configured. A supported NIC is required to use Hardware Time Stamps. To check if NIC is supporting Hardware Time Stamps, run the ethtool and a similar output should appear:
# ethtool -T eno4
Time stamping parameters for eno4:
Capabilities:
        hardware-transmit     (SOF_TIMESTAMPING_TX_HARDWARE)
        software-transmit     (SOF_TIMESTAMPING_TX_SOFTWARE)
        hardware-receive      (SOF_TIMESTAMPING_RX_HARDWARE)
        software-receive      (SOF_TIMESTAMPING_RX_SOFTWARE)
        software-system-clock (SOF_TIMESTAMPING_SOFTWARE)
        hardware-raw-clock    (SOF_TIMESTAMPING_RAW_HARDWARE)
PTP Hardware Clock: 3
Hardware Transmit Timestamp Modes:
        off                   (HWTSTAMP_TX_OFF)
        on                    (HWTSTAMP_TX_ON)
Hardware Receive Filter Modes:
        none                  (HWTSTAMP_FILTER_NONE)
        ptpv1-l4-sync         (HWTSTAMP_FILTER_PTP_V1_L4_SYNC)
        ptpv1-l4-delay-req    (HWTSTAMP_FILTER_PTP_V1_L4_DELAY_REQ)
        ptpv2-event           (HWTSTAMP_FILTER_PTP_V2_EVENT)
The time in containers is the same as on the host machine, and so it is enough to synchronize the host to the primary clock.
PTP requires a few kernel configuration options to be enabled:
- CONFIG_PPS
- CONFIG_NETWORK_PHY_TIMESTAMPING
- CONFIG_PTP_1588_CLOCK
Primary clock
This is an optional step if you already have a primary clock. The below steps explain how to set up a Linux system to behave like ptp GM.
On the primary clock side, take a look at the /etc/sysconfig/ptp4l file. It is the ptp4l daemon configuration file where starting options will be provided. Its content should look like this:
OPTIONS=”-f /etc/ptp4l.conf -i <if_name>”
<if_name> is the interface name used for time stamping and /etc/ptp4l.conf is a configuration file for the ptp4l instance.
To determine if a primary clock PTP protocol is using BMC algorithm, and it is not obvious which clock will be chosen as primary clock. However, users can set the timer that is preferable to be the primary clock. It can be changed in /etc/ptp4l.conf. Set priority1 property to 127.
After that start ptp4l service.
service ptp4l start
Output from the service can be checked at /var/log/messages, and for primary clock, it should be like this:
Mar 16 17:08:57 localhost ptp4l: ptp4l[23627.304]: selected /dev/ptp2 as PTP clock
Mar 16 17:08:57 localhost ptp4l: [23627.304] selected /dev/ptp2 as PTP clock
Mar 16 17:08:57 localhost ptp4l: [23627.306] port 1: INITIALIZING to LISTENING on INITIALIZE
Mar 16 17:08:57 localhost ptp4l: ptp4l[23627.306]: port 1: INITIALIZING to LISTENING on INITIALIZE
Mar 16 17:08:57 localhost ptp4l: [23627.307] port 0: INITIALIZING to LISTENING on INITIALIZE
Mar 16 17:08:57 localhost ptp4l: ptp4l[23627.307]: port 0: INITIALIZING to LISTENING on INITIALIZE
Mar 16 17:08:57 localhost ptp4l: [23627.308] port 1: link up
Mar 16 17:08:57 localhost ptp4l: ptp4l[23627.308]: port 1: link up
Mar 16 17:09:03 localhost ptp4l: [23633.664] port 1: LISTENING to MASTER on ANNOUNCE_RECEIPT_TIMEOUT_EXPIRES
Mar 16 17:09:03 localhost ptp4l: ptp4l[23633.664]: port 1: LISTENING to MASTER on ANNOUNCE_RECEIPT_TIMEOUT_EXPIRES
Mar 16 17:09:03 localhost ptp4l: ptp4l[23633.664]: selected best master clock 001e67.fffe.d2f206
Mar 16 17:09:03 localhost ptp4l: ptp4l[23633.665]: assuming the grand master role
Mar 16 17:09:03 localhost ptp4l: [23633.664] selected best master clock 001e67.fffe.d2f206
Mar 16 17:09:03 localhost ptp4l: [23633.665] assuming the grand master role
The next step is to synchronize PHC timer to the system time. To do that phc2sys daemon will be used. Firstly edit configuration file at /etc/sysconfig/phc2sys.
OPTIONS="-c <if_name> -s CLOCK_REALTIME -w"
Replace <if_name> with the interface name. Start the phc2sys service.
service phc2sys start
Logs can be viewed at /var/log/messages and it looks like this:
phc2sys[3656456.969]: Waiting for ptp4l...
phc2sys[3656457.970]: sys offset -6875996252 s0 freq  -22725 delay   1555
phc2sys[3656458.970]: sys offset -6875996391 s1 freq  -22864 delay   1542
phc2sys[3656459.970]: sys offset       -52 s2 freq  -22916 delay   1536
phc2sys[3656460.970]: sys offset       -29 s2 freq  -22909 delay   1548
phc2sys[3656461.971]: sys offset       -25 s2 freq  -22913 delay   1549
Secondary clock
The secondary clock configuration will be the same as the primary clock except for phc2sys options and priority1 property for ptp4l. For secondary clock priority1 property in /etc/ptp4l.conf should stay with default value (128). Run ptp4l service. To keep the system time synchronized to PHC time, change phc2sys options in /etc/sysconfig/phc2sys using the following command:
OPTIONS=”phc2sys -s <if_name> -w"
Replace <if_name> with the interface name. Logs will be available at /var/log/messages.
phc2sys[28917.406]: Waiting for ptp4l...
phc2sys[28918.406]: phc offset -42928591735 s0 freq  +24545 delay   1046
phc2sys[28919.407]: phc offset -42928611122 s1 freq   +5162 delay    955
phc2sys[28920.407]: phc offset       308 s2 freq   +5470 delay    947
phc2sys[28921.407]: phc offset       408 s2 freq   +5662 delay    947
phc2sys[28922.407]: phc offset       394 s2 freq   +5771 delay    947
Since this moment, both clocks should be synchronized. Any Docker container running in a pod is using the same clock as host so its clock will be synchronized as well.
BIOS configuration
Below is the subset of the BIOS configuration. It contains the list of BIOS features that are recommended to be configured for FlexRAN DU deployment.
2nd Generation Intel® Xeon® Scalable Processors platforms BIOS configuration:
[BIOS::Advanced]

[BIOS::Advanced::Processor Configuration]
Intel(R) Hyper-Threading Tech=Enabled
Active Processor Cores=All
Intel(R) Virtualization Technology=Enabled
MLC Streamer=Enabled
MLC Spatial Prefetcher=Enabled
DCU Data Prefetcher=Enabled
DCU Instruction Prefetcher=Enabled
LLC Prefetch=Enabled

[BIOS::Advanced::Power & Performance]
CPU Power and Performance Policy=Performance
Workload Configuration=I/O Sensitive

[BIOS::Advanced::Power & Performance::CPU C State Control]
Package C-State=C0/C1 state
C1E=Disabled           ; Can be enabled Power savings
Processor C6=Disabled

[BIOS::Advanced::Power & Performance::Hardware P States]
Hardware P-States=Disabled

[BIOS::Advanced::Power & Performance::CPU P State Control]
Enhanced Intel SpeedStep(R) Tech=Enabled
Intel Configurable TDP=Enabled
Configurable TDP Level=Level 2
Intel(R) Turbo Boost Technology=Enabled
Energy Efficient Turbo=Disabled

[BIOS::Advanced::Power & Performance::Uncore Power Management]
Uncore Frequency Scaling=Enabled
Performance P-limit=Enabled

[BIOS::Advanced::Memory Configuration::Memory RAS and Performance Configuration]
NUMA Optimized=Enabled
Sub_NUMA Cluster=Disabled

[BIOS::Advanced::PCI Configuration]
Memory Mapped I/O above 4 GB=Enabled
SR-IOV Support=Enabled
CPU frequency configuration
Below is a script which configures the CPU frequency and uncore frequency for optimal performance - this needs to be adjusted accordingly to specific CPU SKUs.
To run the script download msr-tools:
yum install -y msr-tools
Example for 2nd Generation Intel® Xeon® Scalable Processor - Intel(R) Xeon(R) Gold 6252N
#!/bin/bash

cpupower frequency-set -g performance

wrmsr -a 0x199 0x1900

#Set Uncore max frequency
wrmsr -p 0 0x620 0x1e1e
wrmsr -p 35 0x620 0x1e1e
References
- FlexRAN Reference Solution Software Release Notes - Document ID:575822
- FlexRAN Reference Solution LTE eNB L2-L1 API Specification - Document ID:571742
- FlexRAN 5G New Radio Reference Solution L2-L1 API Specification - Document ID:603575
- FlexRAN 4G Reference Solution L1 User Guide - Document ID:570228
- FlexRAN 5G NR Reference Solution L1 User Guide - Document ID:603576
- FlexRAN Reference Solution L1 XML Configuration User Guide - Document ID:571741
- FlexRAN 5G New Radio FPGA User Guide - Document ID:603578
- FlexRAN Reference Solution xRAN FrontHaul SAS - Document ID:611268